|
Track and Roadbed Construction |
Technical Pages |
||
|
The Track |
|||
|
My garden railway is built with tracks that match what is called "Gauge 1". The rails are 45 millimetres (about 1.75 inches) between the rails. This equates to a standard gauge railway's 4 feet 8 1/2 inches, in 1/32 scale. There are a number of brands of track available, in Canada. I did most of my shopping at Art Knapp Trains in Surrey, just south of Vancouver. I settled on using LGB track and switches (turnouts,[USA] points [UK]) for a number of reasons, even though it wasn't the least expensive. Just an aside, when you go shopping for track, remember there are a lot of different kinds and brands. Rail is described by its height (Code 250, Code 332). The "code" is just the height of the rail measured in thousandths of an inch. So, code 250 rail is .250" tall, or 1/4". Track is also differentiated by scale, that is whether the ties (sleepers [UK]) are sized and spaced for narrow gauge, metre gauge or standard gauge. You can lay brass, stainless steel or aluminum. Most garden railways use code 332 standard gauge brass for its looks, availability and ability to handle all the various equipment that runs on 45 mm gauge track. More about gauge and scale some other time. Anyway, I decided to use LGB brass rail after seeing how it
ages. I know, strange reason, but here's why. After the track sits out in
the weather for awhile it changes colour (oxidizes) LGB turns dark brown,
almost black, just like the big guys steel rails. Most other brands just
stay their bright, shiny brass colour and stainless stays, well, stainless.
|
|||
|
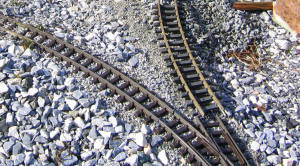
The two pieces of rail in this picture are about the same age (3 years). The curve to the left is LGB, the curve to the right is another brand. |
 |
Both have served satisfactorily, but you can see that the LGB has turned dark and rail-like while the other is still brassy. |
|
|
Connecting the Rail
A method for Soldering Track in Detail Laying It Down My track is
laid using a base of 1/4 inch crushed granite that has been put into a 6 to
8 inch wide cut. The base dirt is tamped down and then gravel added and
leveled to rough grade. The track is then leveled for grade
and from side to side using gravel fines. For this, I have been using #2
chicken grit, available from the local feed store. I started using #1 grit,
which is smaller and looks better, but it kept getting washed away in our wet
coast weather! This method is generally called a float. The track 'floats'
in the ballast, just as the full-sized railways do.
A Track Plan of the layout
as it is built as of April 2006 |
||||
| Home | Tech Pages Home | |||
| This page was last updated on 05 May 2014. | ||||
![]() Under Construction - We're working on the Railway
Under Construction - We're working on the Railway![]()
|
Our Pitt Meadows Weather Station is located at 2km northeast of Pitt Meadows Airport | ||
| Skeena Pacific Family Sites | |||
|
1999
2000
2001 2002
2003
2004 2005
2006
2007
2008
2009
2010
2011 |
|
For comments, suggestions or
corrections, email the
webmaster |