|
Track and Roadbed Construction |
Technical Pages |
||
|
Connecting the Track |
|||
|
Alternative Method For Track Soldering This is an article I wrote for the Garden Railway Club newsletter in May, 2007. I hope you find it useful. Just a little background before I get to the nitty gritty. I've only been in the wondrous Garden Railway world since 2000 but I've kicked around at all sorts of things that have required the use of a soldering iron or soldering gun. While I'm no expert, I've gained some useful practical knowledge in making things connect, electrically, and work well, while avoiding the dreaded cold-solder joint. More on that later. Most of my efforts to join pieces of metal together using solder have involved small wires and finicky electronic parts that don't like too much heat, but working on bigger pieces of metal is quite different, though the principles are the same. If you use track power for your garden railway, one of the many challenges is to keep power flowing to all parts of the track when you want it. It's frustrating to get a train into a long block-section only to find it's not getting any power because of bad rail joints that are not transferring the power properly. Skeena Pacific Railway is track-powered. But (finally) it suffers very few track power problems due to bad electrical joints. Over the time that the track has been down, I've tried several methods to maintain continuity of power across rail joins. Someone suggested running additional wires along the track and connecting them at intervals to keep the power up. To me, this seemed unnecessary when there were already two, large pieces of brass already there to conduct the power. It must be just a matter of making the joints conduct electricity better. I used electrically-conductive grease on the railjoiners. When that wasn't satisfactory, I tried soldering the joints together. Limited success was achieved but my 260 watt Weller soldering gun just couldn't put enough heat into the rails to get a good join, resulting in... tada.. the dreaded cold-solder joint. It looks like it has worked, but it hasn't. That's when I started using a propane torch. Lots of heat. WAY TOOO MUCH heat. Wrecked the plastic ties, made a mess. Right idea but the wrong tool. An explanation for those who want it. To make a good solder joint, one that electricity will like, requires having a good, tight physical joint. The pieces have to fit snugly together. You also need to have both of the pieces being joined: Clean - use a small wire brush, the type you can get from most hardware stores that are used for cleaning small pieces. Prepared - use solder paste on both pieces. I don't recommend using 'acid' based paste such as that used in plumbing as it may eventually rot rail joiners. You can get resin-based paste and solder, such as is used in electronics, from Radio Shack, or whatever it's called, or a neat little store in Langley. Hot - this is the tricky part. Both pieces need to be hot enough to allow the solder to melt properly, 'flow', and adhere to both pieces to make the join. Without these, you will not have a successful solder joint. So after the propane-torch episode, I decided I needed a 'resistance-solder' rig. Without too much detail, this electrically charges each piece of metal so they both get hot. I looked around and found that 'American Beauty' http: //www.americanbeautytools.com/ had such an item, but it is (for my pocketbook) very expensive. If you are making brass models and such, it's a wonderful tool, but.....$$$. I found an article on how to make your own resistance soldering rig, but I'm too lazy, uh, busy. So, why not, I said to myself, use my 260 watt Weller gun as a resistance solderer. What the gun does is put low-voltage electricity into two sides that meet at a tip. Squeeze the trigger, power goes to the tip, the tip gets hot. What if I cut the tip, and put one electrode (tip-piece) on each side of the metal pieces to be joined? The pieces to be joined would become the 'tip' get hot and... voila... a good solder joint. You do have to have a little patience, this method does take a little time to get the necessary heat into the rail-joiner and the rail itself, but it does the job. No melted ties. No damage to the track. |
|||
| The various pictures show how I went about this. You can tell the brass rail is hot enough when it changes color. The best solder joints are made when the solder is cooled quickly, so have a squeeze-bottle of water on hand to cool the joint. And be careful, the rail stays quite hot for quite some time even after you have doused it in water. |
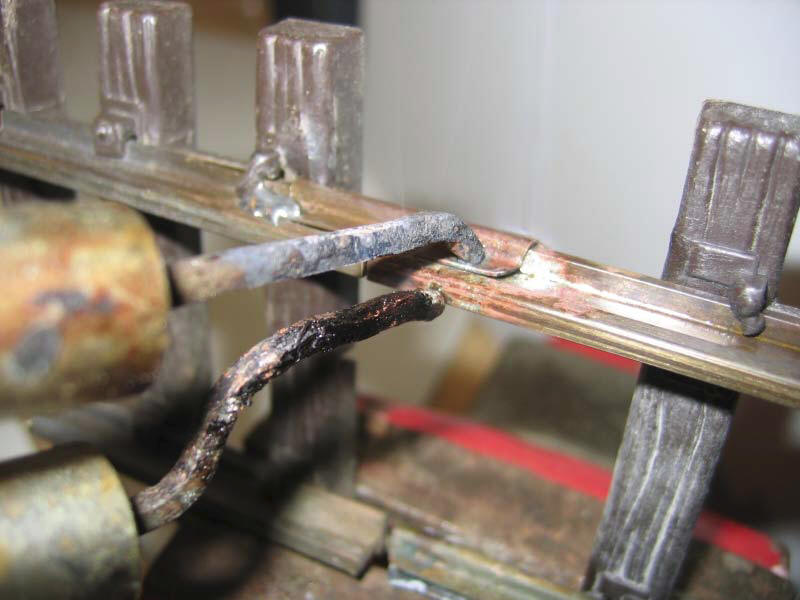 |
In this detail, you can see how one tip is placed on the rail and the other tip is on the rail-joiner. The heat has been applied and the solder has already been melted into the joint. The melted solder appears to be "sucked-in" when both pieces are hot enough for a good joint. You can tell by the discolouration of both the rail-joiner and the rail that both pieces are hot. This will be a good joint. It only needs a spray of water to cool the joint rapidly to finish the process. If you look closely, just behind the top of the tip, you can see a 'bad' joint. The solder is on the surface, irregular and sharpedged. Not a joint that will last, either physically or electrically. |
|
 |
This rail has been previously soldered, but still has to be prepared by scraping it with a wire brush. Next, paste flux will be brushed on to further help clean the joint and promote the solder to flow when heat is applied. |
|||||
|
A couple of rail-laying notes. When possible, I solder rail sections together in the shop, up to 15 feet (whatever in meters) long. Those sections are joined using over-the-rail rail clamps. (Usually available at good ol' Art Knapp's) All switches (turnouts[US] points[UK]) are joined using rail clamps. In this way, should it be necessary to replace rail, it is fairly easy to lift a section and de-solder it using the same method to apply heat. Just to prove it could be done, the entire Skeena Pacific Railway main line, about 350 feet, has been operated very successfully from one electrical input after improving the rail joints. |
|
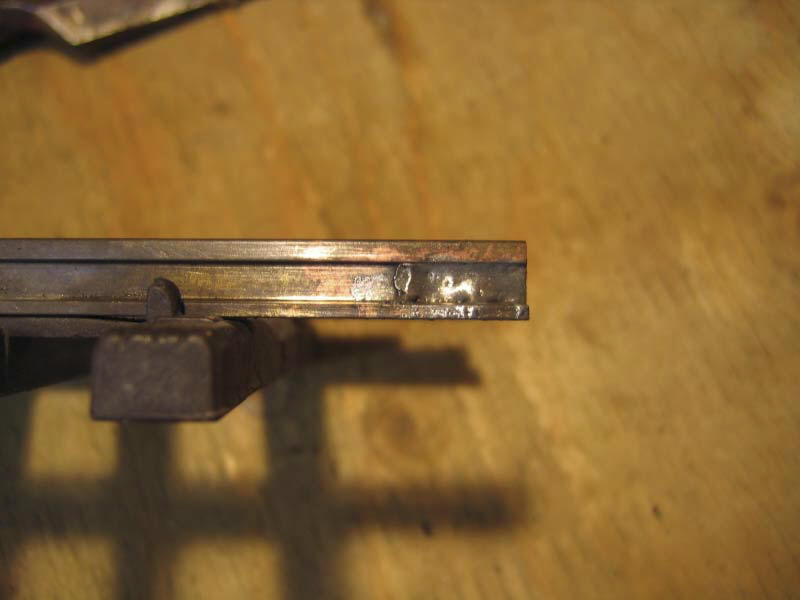
A completed rail section, soldered and ready for laying.This is "rebuilt" old track. If you look closely, you can see the damaged tie, the result of using a propane torch for soldering. Not good | ||||
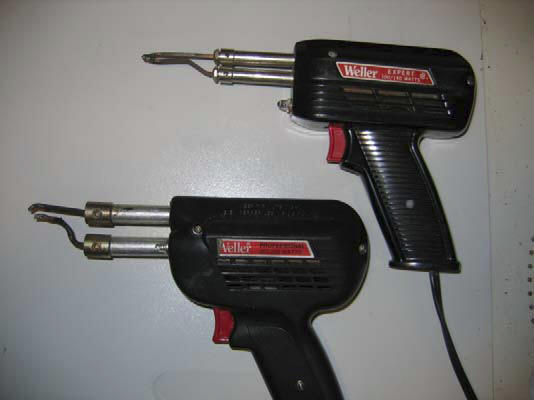 A 'normal' soldering gun (top) and the cut-tip 260 watt gun (bottom) |
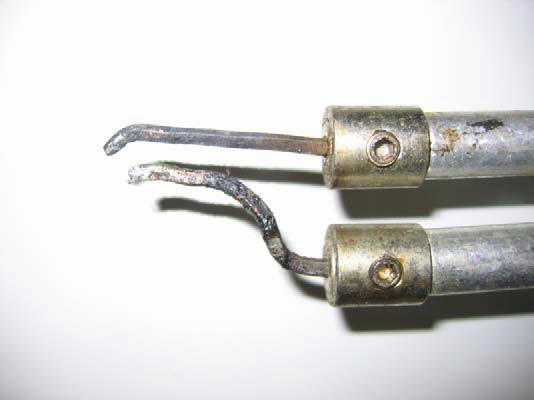 The cut-tip has to be 'tinned' to promote good heat transfer. |
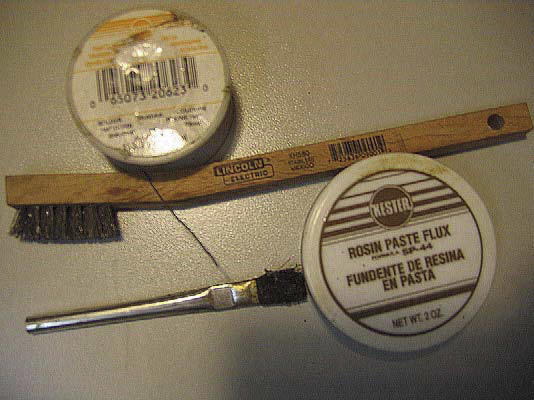 These are the other tools and supplies: Top left - rosin core solder; middle - stainless wire brush; bottom left - flux brush; bottom right - rosin paste flux. |
||||
| Home | Tech Pages Home | |||||
| This page was last updated on 03 Jan 2014. | ||||||
![]() Under Construction - We're working on the Railway
Under Construction - We're working on the Railway![]()